VuePress + Github Pages 搭建博客
本文将教大家如何用 vuepress + github 搭建静态博客
前提条件: VuePress 需要 Node.js >= 8.6
1. 本地搭建项目
本地快速构建静态博客,参考 VuePress 官网:
1、cmd 创建项目目录,项目目录名称自定义,我这里指定为 vuepress-starter
mkdir vuepress-starter && cd vuepress-starter
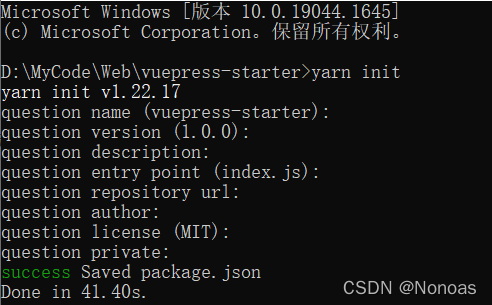
2、使用 npm 或 yarn 初始化项目
yarn init
#或 npm init
这些信息懒得填的话,可以直接一路回车到底
3、安装 VuePress 为本地依赖
yarn add -D vuepress
#或 npm install -D vuepress
4、创建文件夹 docs,新建 README.md 创建你的第一篇文档,VuePress 会以 docs 为文档根目录,所以这个 README.md 相当于主页
mkdir docs && echo Hello VuePress > docs/README.md
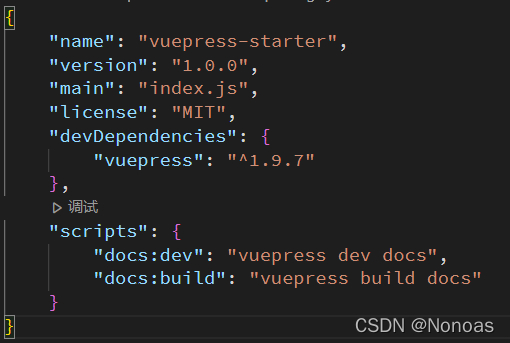
5、在 package.json 中添加一些 scripts
{
  "scripts": {
    "docs:dev": "vuepress dev docs",
    "docs:build": "vuepress build docs"
  }
}
加入以上脚本后如下图:
6、运行以下脚本,启动本地服务
yarn docs:dev
#或 npm run docs:dev
启动后显示
success [21:23:08] Build 8f2010 finished in 106 ms! ( http://localhost:8081/ )
使用上面的网址 http://localhost:8081/ 访问页面,效果如下:

2. 基础配置
在文档目录下创建一个 .vuepress 目录,所有 VuePress 相关的文件都会被放在这里。
此时项目结构应该是这样:
.
├─ docs
│  ├─ README.md
│  └─ .vuepress
└─ package.json
在 .vuepress 文件夹下添加 config.js,配置网站的标题和描述,方便 SEO
module.exports = {
  title: 'VuePress 教程',
  description: 'VuePress 搭建静态博客教程'
}
3. 新增导航栏
导航栏分 顶部栏 和 侧边栏
顶部栏
我们现在在页首的右上角添加导航栏,修改 config.js
module.exports = {
    title: 'VuePress 教程',
    description: 'VuePress 搭建静态博客教程',
    themeConfig: {
        nav: [
            { text: '首页', link: '/' },
            {
                text: 'Nonoas 博客',
                items: [
                    { text: 'Github', link: 'https://github.com/Nonoas' },
                    { text: 'CSDN', link: 'https://blog.csdn.net/weixin_44155115' }
                ]
            }
        ]
    }
}
网页预览效果如下

侧边栏
我们现在多添加两篇文章,当前目录如下:
.
├─ docs
│  ├─ README.md
│  └─ .vuepress
│     └─ config.js
|  └─ note
|      └─ javaPlugin.md
|      └─ nvmInstall.md
└─ package.json
再在 config.js 配置 sidebar :
module.exports = {
    themeConfig: {
        nav: [
            { text: '首页', link: '/' },
            {
                text: 'Nonoas 博客',
                items: [
                    { text: 'Github', link: 'https://github.com/Nonoas' },
                    { text: 'CSDN', link: 'https://blog.csdn.net/weixin_44155115' }
                ]
            }],
        // 侧边栏配置
        sidebar: [
            {
                title: '导航栏',
                path: '/',
                collapsable: false, // 不折叠
                children: [
                    { title: "学前必读", path: "/" }
                ]
            },
            {
                title: "文章导航",
                path: '/note/javaPlugin', // 默认激活的选项
                collapsable: false, // 不折叠
                children: [
                    { title: "java插件开发", path: "/note/javaPlugin" },
                    { title: "nvm安装教程", path: "/note/nvmInstall" }
                ],
            }
        ]
    }
}
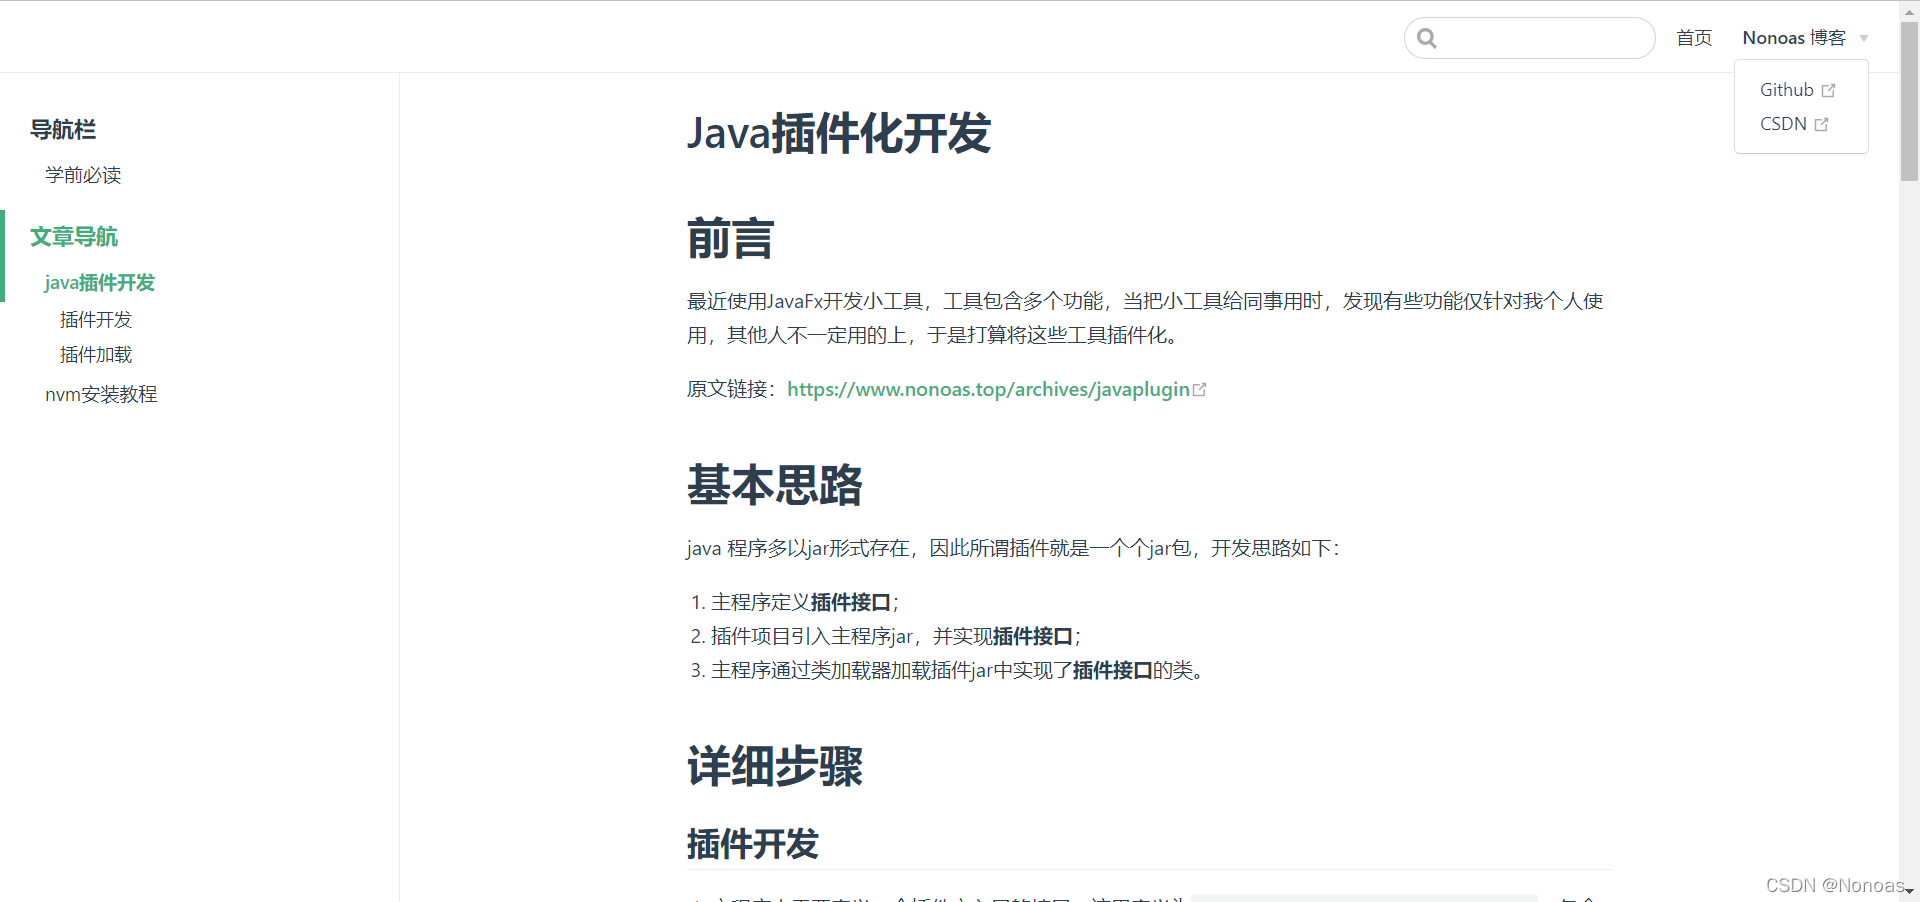
当前预览效果如下:
4.部署到github
config.js 中添加 base 配置,内容为 github 仓库名称
module.exports = {
	base:'/Nonoas-Notes/',
    title: 'VuePress 教程',
    description: 'VuePress 搭建静态博客教程',
    themeConfig: {
        // ...
    }
}
项目根目录运行以下指令
yarn docs:dev
#或 npm docs:dev
会在 .vuepress 目录下生成 dist 目录,里面就是我们所需要的静态文件,提交到 github 网页就可以访问了
https://nonoas.github.io/Nonoas-Notes/
不会用 github 部署静态网页的请看 :github部署静态博客项目